Artifacts are the backbone of character optimization in Genshin Impact. Whether you’re tackling Spiral Abyss, farming domains, or exploring Teyvat, your artifacts make the difference between a serviceable build and an unstoppable powerhouse. The artifact system can feel overwhelming at first, there are hundreds of combinations, competing priorities, and diminishing returns to manage. But once you understand the fundamentals, you’ll know exactly what to farm, how to prioritize substats, and which sets work best for each character. This guide breaks down everything you need to know about Genshin Impact artifacts in 2026, from basic rarity tiers to advanced optimization strategies that’ll help you squeeze every bit of power from your team.
Table of Contents
ToggleKey Takeaways
- Genshin Impact artifacts come in five rarity tiers, but only 4-star and 5-star pieces matter endgame, with 5-star artifacts offering significantly higher stat caps at +20 level.
- Each character equips five artifact slots with fixed main stat types, and matching the right main stat to your character’s scaling (like Elemental Damage Goblet for DPS) is essential for optimal performance.
- Strategic substat prioritization—balancing CRIT Rate/CRIT DMG for DPS, Energy Recharge for supports, and Elemental Mastery for reaction teams—compounds into massive power gains and enables consistent team rotations.
- Domain farming efficiency depends on targeting Domains that share artifact set bonuses across multiple characters and focusing on one team at a time before branching into additional compositions.
- The Strongbox system and Artifact Exchange tools transform farming from pure RNG into a tactical progression method, allowing you to convert bad rolls into feedstock rather than treating them as total losses.
- Understanding artifact set bonuses—such as Viridescent Venerer’s 40% Elemental Damage shred for Anemo supports or Ocean-Hued Clam’s healing-to-DPS conversion—ensures you farm sets that align with your team’s mechanics and enable intended rotations.
What Are Artifacts in Genshin Impact?
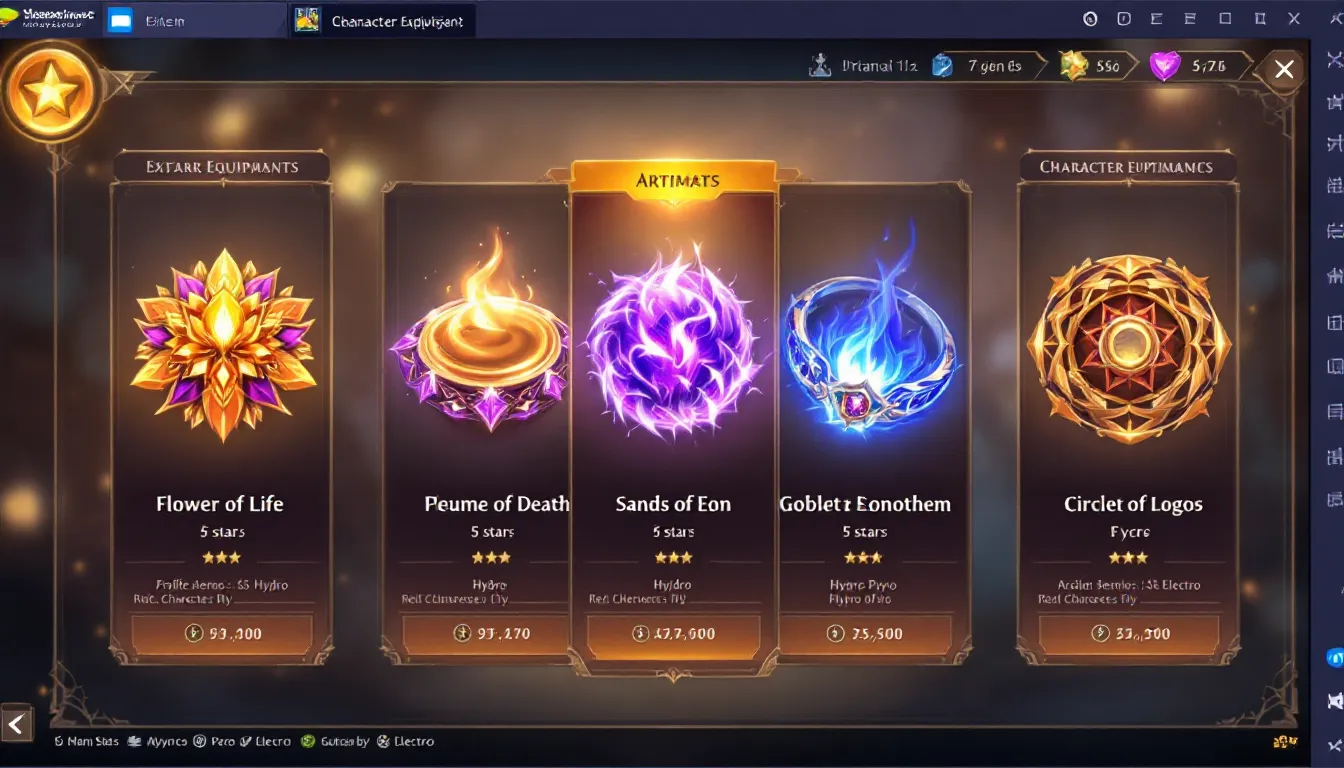
Artifacts are equipment pieces that enhance character stats and provide set bonuses. Every character can equip five artifacts: Flower of Life, Plume of Death, Sands of Eon, Goblet of Eonothem, and Circlet of Logos. Each slot has a fixed main stat type, Flowers always roll HP, Plumes always roll ATK, but the other three pieces (Sands, Goblet, Circlet) can roll any main stat depending on the set and piece.
Think of artifacts like armor in an RPG: they’re essential for survivability and damage output, and they directly scale most of your character’s power. A level 90 character with mediocre artifacts will underperform significantly compared to a level 80 character with optimized artifact rolls. The stat jumps are that substantial.
Artifacts are obtained through Domain farming (the primary method), the Strongbox system, and occasionally as chest rewards. Unlike weapons or characters, artifacts can be freely swapped between characters without cost, making them the most flexible form of progression, though farming quality pieces takes consistent time investment.
Understanding Artifact Rarity and Sets
Rarity Tiers and Drop Rates
Artifacts come in five rarity tiers: 1-star (white), 2-star (green), 3-star (blue), 4-star (purple), and 5-star (gold/orange). In practice, only 4-star and 5-star artifacts matter endgame. A 5-star artifact has significantly higher stat caps than a 4-star, especially at +20 level.
Domain drop rates improve in higher-difficulty Domains. Here’s the general breakdown:
- On-set 5-stars: ~33% in level 90 Domains
- Off-set pieces: Split among other artifact sets in the same Domain
- 4-stars and below: The remaining percentage
The frustrating truth: even in level 90 Domains, off-set pieces dilute your on-set pull rate. This is why farming efficiency matters, you want to target Domains that share set bonuses you need across multiple characters.
How Artifact Sets Work
Artifact sets provide bonuses when you equip multiple pieces:
- 2-piece bonus: Activate at two pieces equipped
- 4-piece bonus: Activate at four pieces equipped (most powerful)
Sets are categorized by their playstyle benefit. Some enhance damage (Gladiator’s Finale, Wanderer’s Troupe), others provide elemental boosts (Crimson Witch of Flames, Thundering Fury), and some enable specific mechanics (Viridescent Venerer for Anemo supports, Noblesse Oblige for burst damage). The meta shifts with each new character release and balance adjustment, but foundational sets like Viridescent Venerer remain essential.
You can also mix 2-piece bonuses for flexibility. For example, pairing Viridescent Venerer (Anemo damage) with another set’s 2-piece bonus is common for supports who need both elemental buffing and energy sustain.
Main Stats, Substats, and Artifact Scaling
Choosing the Right Main Stats
Each slot has a main stat that scales with artifact level. Your main stat choices are:
- Sands: ATK%, Elemental Mastery, or Energy Recharge
- Goblet: Elemental Damage%, Physical Damage%, or HP%/DEF% (for tanks)
- Circlet: CRIT Rate, CRIT DMG, Elemental Mastery, ATK%, HP%, or DEF%
Choosing the wrong main stat tanks your character’s potential. A Fischl DPS with Elemental Mastery Goblet instead of Electro Damage loses massive damage scaling. The hierarchy is simple: match your main stat to your character’s scaling.
For most DPS characters, the priority is Elemental Damage Goblet, then CRIT stats on Circlet (alternating CRIT Rate and CRIT DMG depending on your ratio). Supports often prioritize Energy Recharge on Sands to ensure ultimate availability. Tanks prioritize HP% or DEF% depending on their kit.
Substat Priority and Optimization
Substats are secondary stats that roll when you level an artifact from 0 to 20. Each artifact starts with three or four substats and gains an additional substat at levels 4, 8, 12, 16, and 20. Substats scale as you level, meaning a +20 artifact’s substats are roughly 3x stronger than a +0 artifact’s equivalent stats.
The five possible substats are CRIT Rate, CRIT DMG, ATK%, Elemental Mastery, and Energy Recharge. DEF% and HP% can roll but are generally avoided for DPS (unless building tanks).
Optimal substat priority depends on your character and role:
- CRIT-based DPS: CRIT Rate and CRIT DMG (balance toward 70-80% CRIT Rate, rest into CRIT DMG)
- Elemental Mastery scalers (Bloom, Aggravate teams): Elemental Mastery + CRIT stats
- Energy-hungry supports: Energy Recharge to 160-200%, then ATK% or Elemental Mastery
- Shielders: DEF% or HP% for survivability, sometimes Energy Recharge
A key rule: no substat is wasted if it helps you hit a meaningful threshold. Hitting 100% Energy Recharge enables off-field rotations. Reaching 70% CRIT Rate unlocks consistent crits. Aiming for 600+ Elemental Mastery on Bloom characters maximizes reaction damage. Once thresholds are met, min-maxing becomes about upgrading weaker rolls.
The Best Artifact Sets for Popular Character Types
DPS Characters and Support Builds
DPS character builds have shifted significantly in 2026 as the meta has evolved. On-field DPS generally default to one of these sets:
- Gladiator’s Finale: +18% ATK at 4-piece, still solid for physical and ATK-scaling DPS. Universal fallback.
- Wanderer’s Troupe: +80 Elemental Mastery at 4-piece, excellent for reaction-heavy DPS like Hu Tao or Alhaitham.
- Echoes of an Offering: +18% ATK with a proc-based ATK boost, strong for normal-attack-heavy DPS (Ayaka, Ayato).
- Vermillion Hereafter: +18% ATK with stacking ATK bonuses, excellent for burst-focused DPS.
Support builds depend on role. Viridescent Venerer (4-piece) is nearly mandatory for Anemo supports, the 40% Elemental Damage Bonus shred alone justifies farming it. Noblesse Oblige (4-piece) is ideal for burst-support characters, providing 20% Burst damage and ATK% buff to the team. Tenacity of the Millelith provides shields and ATK buff but requires shield-granting to proc.
For off-field Sub-DPS (like Fischl, Xingqiu, or Nahida in support roles), focus on sets that enhance their off-field contribution: Viridescent Venerer for Anemo, Instructor for Elemental Mastery buff, or Exile/Scholar for Energy Recharge support.
The Best Genshin Impact Characters, Teams, and Builds in 2025 provides detailed build recommendations for meta characters, including exact artifact set priorities.
Healers and Shield Supports
Healers don’t need much optimization, they just need HP%, ATK%, and Energy Recharge to function. Artifact sets for healers include:
- Ocean-Hued Clam: +15% healing bonus with an orb-stacking damage proc, turns healing into DPS contribution. Overpowered for pure healers like Barbara or Qiqi.
- Maiden Beloved: +15% healing bonus at 4-piece, straightforward healing boost.
- Tenacity of the Millelith: +20% HP with an ATK buff aura, provides team utility beyond healing.
Shield supporters (like Zhongli) prioritize HP% to scale shield strength. Zhongli’s 4-piece Tenacity makes him provide team ATK buff while shielding, enabling flexible team building. Other shield users (Diona, Kokomi support role) follow similar patterns: HP/DEF% main stats, Energy Recharge substats.
The resource efficiency of healers means you can slot them 4-star artifacts and still succeed, healing scales harder than DPS, so substat requirements are more forgiving. This saves Resin on multiple team compositions.
Artifact Farming and Acquisition Strategies
Domain Farming and Energy Efficiency
Domains are instanced dungeons where you spend Original Resin (20 per clear) to farm artifacts from specific sets. Understanding domain layouts and reward tiers is crucial for efficiency.
Level 90 Domains (the highest difficulty) give the best 5-star drop rates but require substantial investment in character levels and weapons. Many players farm level 80 Domains instead, the stat difference is minor compared to Resin efficiency, especially early game.
Resin management is everything. A single Original Resin regenerates every 8 minutes (170 total per day). Farming artifacts for even one team takes weeks, farming four or five optimized teams takes months. This is why:
- Focus on one team at a time. Optimize your main team completely before branching.
- Farm Domains that share sets. If you need Viridescent Venerer (for Kazuha) and Thundering Fury (for Fischl), they drop in the same Domain.
- Know your thresholds. You don’t need perfect artifacts, aim for “good enough” (acceptable main stat, 2-3 relevant substats) then move on.
Some players use condensed Resin (a craftable item that holds two Domain runs and costs 40 Original Resin) to batch farm during high-efficiency stretches. Others spread farming across multiple Domains weekly to avoid burnout.
Using the Strongbox and Artifact Exchange
The Strongbox (unlocked at Adventurer Rank 45) lets you convert 3 artifacts into 1 random artifact from a chosen set, essentially a free Domain run weekly. This is insanely valuable: prioritize Strongbox conversions for niche sets you don’t farm actively.
The Artifact Exchange system (added in later patches) lets you convert artifact pieces into different slots. You can turn a Sands piece from an on-set farm into a Goblet or Circlet using currency, though currency is limited. This is most useful when you get perfect substats on the wrong slot, e.g., a god-roll off-set Circlet that’d waste in Domain farming.
These systems transform farming from pure RNG into something tactical. Bad artifact rolls aren’t necessarily lost, they can become feedstock for Strongbox conversions or stat adjustments, reducing pure waste.
According to gaming guides on Pocket Tactics, strategic Resin allocation across multiple systems (active farming, Strongbox, and conversions) is how dedicated players optimize progression without burning out.
Leveling, Upgrading, and Enhancement Mechanics
Artifacts level from 0 to 20, costing mora and XP materials. Early levels (0-4) are cheap and quick: later levels (16-20) require exponentially more resources. Each level increases main stat and all substats proportionally.
Substat upgrades happen at specific breakpoints: levels 4, 8, 12, 16, and 20. When an artifact hits these levels, it gains +1 level to a random substat (or adds a new substat if slots remain). This RNG is the true grind, you might level an artifact to 20 and get three “bad” stat upgrades, wasting mora on a piece you’ll never use.
Mora cost scales heavily with rarity. A 5-star artifact costs roughly 260k mora to level 0-20, while a 4-star costs ~130k. Weekly Mora ley lines are essential to sustain leveling, many players spend 50% of weekly Resin on Mora to keep artifact leveling active.
Optimization strategy: only level artifacts to +20 if they have good main stat and 2+ desired substats. If an artifact rolls poorly at level 12-16, stop leveling and convert it to Strongbox materials or artifact food. Wasting 100k mora on a mediocre piece delays progress on better pieces.
Artifact food (3-star artifacts and unwanted leveled pieces) can be fed to new artifacts to speed leveling. Converting “trash” 4-stars and 5-stars into food after a Domain farming session saves mora in the long run.
The Top Genshin Impact Characters, Teams, and Tips for 2025 covers how meta shifts impact artifact farming priorities, since viable sets and stat thresholds change with new characters and balance patches.
Artifact Comparison Tools and Community Resources
Tracking optimal artifacts for dozens of characters is impractical without tools. The community has created several resources that simplify artifact selection:
Artifact Calculators and Databases:
- KeqingMains and other character guides: Community-maintained spreadsheets ranking artifact sets for each character by role and meta viability. Updated with each patch.
- Genshin Optimizer: A browser-based tool where you input your artifacts, and it calculates your character’s total stats and suggests optimization targets. Invaluable for fine-tuning substat priorities.
- Paimon.moe: Database tracking artifact sets, drop locations, and crafting recipes. Quick reference for “where do I farm X set?”
References like Twinfinite’s gaming guides often contain tier lists and set recommendations for current-meta characters, though Genshin specifically requires community tools for the most up-to-date information.
The Genshin Impact Tools: Essential Resources guide compiles optimizers, calculators, and reference sites, bookmarking that resource saves hours of searching scattered wikis.
When evaluating tools, prioritize ones that update regularly (ideally within one or two patches of new content). Outdated recommendations can lead to farming the wrong sets or prioritizing stats that don’t align with current character releases.
Common Artifact Mistakes to Avoid
Even experienced players fall into these traps:
Farming the “best” set for every character: Sets like Viridescent Venerer and Noblesse Oblige are so universally useful that new players farm them repeatedly across teams. While not wrong, it limits team diversity. Farm complementary sets for different roles, a Fischl off-DPS doesn’t need another Viridescent Venerer if you have Kazuha already using it.
Overleveling artifacts too early: Leveling every decent artifact to +20 wastes mora. Front-load leveling on pieces with perfect main stats and 2+ useful substats. Leave mediocre rolls at +12 or +16 until you confirm they’re keeper pieces.
Ignoring Energy Recharge thresholds: A support with 130% Energy Recharge can’t maintain burst off-cooldown in normal rotations. Every character has a functional ER requirement, ignoring it means your team can’t execute intended rotations, tanking overall DPS.
Chasing perfect substats: A piece with perfect substats (all five rolls into CRIT Rate, for example) takes months of farming. Functional rolls (3-4 useful substats) are 95% as good and take weeks. Accept “good enough” and redeploy Resin elsewhere.
Not understanding set synergy: Pairing Wanderer’s Troupe on a character with 0% Elemental Mastery scaling (like physical DPS) wastes the set bonus. Match artifact sets to character mechanics, Bloom characters want Elemental Mastery, physical carries want ATK%, supports want Energy Recharge or buff stats.
Farming wrong Domains for your team: A new player farming Pale Flame (physical DEF) for their Pyro DPS is moving backward. Identify your current team, find the shared Domains, and commit to one farming rotation for 2-4 weeks.
Resources like Genshin Impact Strategies: Essential Tips and Genshin Impact Guide: Essential Tips address these mistakes in depth with character-specific recommendations.
Conclusion
Artifacts are the cornerstone of character progression in Genshin Impact, and optimizing them separates casual players from those consistently clearing endgame content. The system rewards strategic planning: understanding main stat scaling, prioritizing relevant substats, targeting the right sets, and managing Resin efficiently compounds into massive power gains.
The path forward is straightforward. Identify your primary team, determine what artifact sets they need, focus Resin on those specific Domains for 3-4 weeks, and accept that perfect pieces take time. Use the Strongbox and exchange systems to salvage unfortunate drops. Level strategically, only to +20 on pieces worth keeping.
As patches roll out and new characters reshape the meta, the fundamentals remain: match artifact sets to character kits, hit stat thresholds, and farm with intention. You don’t need perfect artifacts to progress: you need enough good artifacts to hit benchmarks and enable rotations. Start farming your main team today, and you’ll see the payoff in clearer Abyss runs and faster exploration within weeks.